I love fried chicken, but I just don't see myself making it often: I'm not Southern and don't have a recipe from my mom, plus it's messy, a tad unhealthy, etc. But what I can see myself making often is this fabulous chicken dish from Mario Batali's soon-to-be-published book Italian Grill. Make no mistake: this is not fried chicken. But it's a spectacular alternative, crunchy and flavorful and extremely tasty.
To make Chicken Thighs with Snap Peas and Agliata, you coat boneless, skinless chicken thighs with a garlicky bread crumb mixture and cook it slowly over a low grill so, says Mario, "you end up with juicy meat and toasted herbed crust." I initially balked at the "boneless, skinless" suggestion, since in my experience that is the least tasty kind of chicken you can buy. But thighs are juicier, and one I read the recipe through, I realized that if you did use chicken with skin, the breadcrumbs would stick to the skin and slide right off when you cut into the meat. Instead, what winds up happening is the bread crumbs themselves form a sort of skin over the chicken. The meat stays really moist, and the crumbs toast up so nicely.
The secret ingredient here is anchovies, and as some readers know, I have a tenuous relationship with the hairy little fishes. But trust me, in this dish, they work perfectly. There's not a grain of salt in the entire dish (snap peas included); it's just not necessary once you blend in three (or four) anchovies to the bread crumb mixture and spoon a dollop of anchovy paste into the hot olive oil that will coat the beans.
I can't wait to try this recipe on a real grill this summer.--S
Chicken Thighs with Snap Peas and Agliata
Serves 6
12 garlic cloves, crushed
3/4 c extra-virgin olive oil
2 salt-packed anchovies, filleted, rinsed, and patted dry, or 4 oil-packed fillets, drained
1/2 c chopped fresh Italian parsley
2 c fresh bread crumbs
12 boneless, skinless chicken thighs
4 shallots, sliced 1/4" thick
1 t anchovy paste
1 lb sugar snap peas
1. Combine the garlic, 1/2 c of the oil, the anchovies, parsley, and bread crumbs in a food processor and zap until smoothish.
2. Put the chicken thighs in a large bowl and sprinkle with the bread crumb mixture, turning to coat well. Arrange in a single layer on a platter and put in the refrigerator for 15 minutes.
3. Bring a large pot of water to a boil. Set up an ice bath. Drop the snap peas into the water and cook just until bright green, about 1 minute. Drain, plunge into the ice bath to cool, and drain again. Set aside.
4. Prepare a gas or charcoal grill for indirect grilling. [Or heat your grill pan to medium heat.]
5. Place the chicken thighs skinned side up on the cooler part of the grill, cover the grill, and grill, turning once, until the chicken is cooked through, about 15 minutes per side.
6. Meanwhile, heat the remaining 1/4-c. oil in a 10" to 12" saute pan over medium heat. Add the shallots and anchovy paste and cook, stirring occasionally, until the shallots are soft, about 5 minutes. Add the snap peas and cook, stirring, just until heated through. Transfer the snap peas to a platter.
7. Arrange the thighs on top of the snap peas and serve.
Recipe courtesy of Italian Grill
Monday, March 31, 2008
Monday, March 24, 2008
A New Pizza Rustica
I'm learning that every family has their own version of classic dishes, and Pizza Rustica among Italians is no exception. Our family friend Linda makes the traditional savory Easter pie with hard-boiled eggs and salami; my colleague Louisa uses dry basket cheese and sausage. Last year, my family abandoned our usual "Cement Pie" (so named for the dozen or so hard-boiled eggs in one pie) in favor of a jazzier version with spinach and roasted red peppers. And this year, my cousin Kathy and I continued to experiment, with a recipe Chris Kimball of Cook's Illustrated gave me last summer.
This Pizza Rustica was a free-form creation, meaning we shaped it into a pie on a cookie sheet, without the confines of the walls of a pie dish or springform pan. This resulted in a rather, um, rustic looking pie, gently misshapen, but we kind of liked it that way. Besides, it's what's inside the Easter pie that counts, right? And the contents of this pie featured some real gems: fresh spinach, mushrooms, ricotta cheese, freshly grated Parmesan, sweet Italian sausage, prosciutto, and plenty of herbs and spices, plus some beaten eggs to bind it all together. As with any Pizza Rustica I've ever made, this one was labor-intensive, but part of the tradition of the Easter pie is that you make it with your family's help, one or two days before Easter, knowing your extended family is going to be so happy when they see this culinary wonder hit the table.
And when we gathered at my aunt's house on Easter afternoon and sliced the pie, they were happy indeed. Aunt Mimi told me she never really liked Pizza Rustica (some comment about its cement-ness), but that this one, she loved. Pop did his usual routine, throwing his head back in ecstasy and hands in the air at the deliciousness of what Kathy and I had made, as he always does when we cook something--but he later admitted that his performance was not an act, because this time, the food actually warranted such grandiose behavior. My co-chef and I agreed; this was one tasty Pizza. Moist, rich, but not overly so, a little salty from the meats and light, thanks to our extra efforts to press the ricotta through a sieve before mixing it in with the other filling ingredients.
I'm sure we'll return to Cement Pie one of these Easters, but I, for one, am enjoying this walk on the lighter side.--S
Pizza Rustica
Serves 12 as a main course or 18 as an appetizer
10 to 12 ounces fresh spinach, stemmed, washed, or one package (10 ounces) frozen spinach, thawed, squeezed dry
2 egg yolks
1 egg
1 container (15 ounces) ricotta cheese
3/4 c freshly grated Parmesan cheese
3 T unsalted butter
1 medium onion, chopped
2 cloves garlic, minced
1/2 t salt
1/2 t freshly ground black pepper
1/4 t ground nutmeg
1 T olive oil
1 to 1 1/4 c thickly sliced mushrooms (about 4 ounces)
1/2 lb sweet Italian sausage, meat removed from casings
3 to 4 ounces prosciutto, cut into small squares
1/4 c chopped fresh parsley
1 t dried basil, crumbled, or 1/4 c shopped fresh basil
Pinch cayenne pepper
Double recipe pastry dough
Egg wash:
1 egg yolk beaten with 1 t milk or heavy cream
1. If using fresh spinach, blanch briefly in large pot of boiling salted water until wilted, 1 to 2 minutes. Drain; rinse under cold water to stop cooking. Squeeze dry thoroughly. Coarsely chop fresh or frozen spinach. Reserve.
2. Beat egg yolks and egg together in bowl. Sieve in ricotta; stir to combine. Stir in Parmesan.
3. Heat 2 T of the butter in large skillet over medium heat. When foam subsides, add onion. Saute until wilted, about 5 minutes. Add garlic; saute 2 minutes. Add chopped spinach, salt, pepper, and nutmeg. Raise heat; dry out spinach, tossing, about 4 minutes. Add to ricotta mixture.
4. Heat remaining 1 T butter and olive oil in skillet. When foam subsides, add mushrooms. Saute until lightly golden, 3 to 4 minutes. Add to ricotta mixture. Crumble sausage meat into skillet; saute until meat loses raw look, about 4 minutes. Drain excess fat; add sausage to bowl. Add ham, parsley, basil, and cayenne to bowl; toss to combine. Chill. Correct seasonings.
5. Preheat oven to 425 degrees F.
6. Roll out slightly more than one-third of the pastry on a lightly floured surface into 1/8"-thick rectangle or circle. Transfer pastry to baking sheet. Brush lightly with egg wash. Arrange filling on pastry, leaving 1- to 1.5" border all around. Mound filling in center, building up sides.
7. Roll out remaining pastry into rectangle or circle to match bottom. Lay pastry loosely over filling. Press edges of top piece of pastry together with bottom piece of pastry. Trim pastry, leaving 1- to 1.5" border. Brush top piece of pastry with egg wash. Roll up pastry border all around; press against top piece of pastry. Press edge with fork; brush border with egg wash. Cut two or three steam vents in top. Chill.
8. Brush pastry again with egg wash. Form decorations [we used a bunny cookie cutter] with pastry trimmings, if you like. Affix to top; brush with egg wash. Bake until pastry begins to brown, about 10 minutes. If browning too fast, lower oven heat to 350. Bake until golden, about 45 minutes in all. Let pizza sit about 10 minutes. Cut pie in half lengthwise with long serrated knife; then cut in thin crosswise slices. Serve hot or warm.
Monday, March 17, 2008
Just a Little Irish
I usually avoid my local Irish pub on St. Patrick's Day (amateur night, and all that) and I totally forgot to wear green today. But I did celebrate in my own way, baking two loaves of Irish Soda Bread.
My recipe comes from Kathleen's Bake Shop Cookbook, and calls for the usual quick bread ingredients, a touch of sugar, plus raisins, caraway seeds and buttermilk. Traditionalists will say it's not really Irish Soda Bread--apparently the raisins make it Spotted Dog or Railway Cake. Well, whatever it is, it's very easy and very tasty. I enjoyed some last night for dinner, and again this morning, toasted, with a little butter. It's crumbly, a little scone-like, slightly sweet and with a little bite from the caraway. I'll hit Molly's another night, and wear green tomorrow. Today, I'm perfectly happy with soda bread.--S
Irish Soda Bread
4 c all-purpose flour
2 T granulated sugar
1 T baking powder
1 t baking soda
1 t salt
1/2 c butter
1 c raisins
3 T caraway seeds
2 c buttermilk
1. Preheat oven to 375. Lightly grease a large cookie sheet.
2. In a large bowl, stir together flour, sugar, baking powder, baking soda, and salt. Using a pastry blender or fork, cut in butter until mixture resembles coarse meal. Add raisins and caraway seeds and toss lightly. Add buttermilk and toss mixture with a fork until all dry ingredients are moistened. Dough will be very soft.
3. Form dough into a ball and lightly knead on a floured board for about 30 seconds or until dough is smooth. Divide dough into two equal portions and shape into balls. Place them on the cookie sheet, and with a sharp knife, cut an X on top of each loaf about 1/4-in. deep.
4. Bake for 50 minutes, or until crusty and golden.
Yield: 2 loaves.
Recipe courtesy of Kathleen's Bake Shop Cookbook
Sunday, March 16, 2008
Spring Sablés
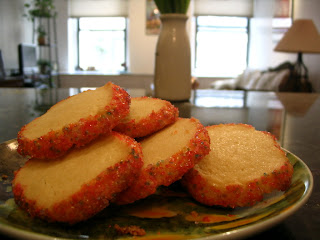
As Dorie Greenspan explains in the intro to her recipe for Sablés, the tender shortbread cookies are as popular in France as chocolate chip cookies are in the U.S. The French word "sablé" means "sandy" in English, and it isn't too far a stretch to imagine these cookies as pecan sandies minus the pecans, since they are buttery, crumbly and truly melt-in-your-mouth. I was looking for a simple yet delicious cookie to give to friends yesterday, and these fit the bill perfectly. I was even able to give them a little springy touch by using sparkly multicolored pastel sugar.
The key to keeping sablés sandy is to mix the dough just enough so the flour is incorporated. You want to work the dough as little as possible; Dorie says it should be moist and clumpy, as opposed to smooth. The other important thing to consider is that butter is the star ingredient in sablés, so it's wise to use quality stuff. The March issue of Saveur has an amazing spread (ha) of great butters, including Plugra European Style Butter, an 82%-fat sweet cream butter, which I used for the sablés. Dorie says the longer you chill the dough before baking the cookies, the better; I chilled it overnight.
It's hard to see a cookie like this taking off in the U.S.--it's too understated and simple to gain real traction against the chocolate chip or the oatmeal raisin. But when you want something yummy to accompany a nice cup of tea, a sablé is just the thing.--S
Sablés
2 sticks (8 oz.) unsalted butter (preferably high-fat, like Plugra), softened at room temperature
1/2 c granulated sugar
1/4 c confectioners' sugar, sifted before measuring
1/2 t salt, preferably sea salt
2 large egg yolks, preferably at room temperature
2 cc all-purpose flour.
For the decoration (optional):
1 egg yolk
Crystal or dazzle sugar
1. Working in a mixer fitted with a paddle attachment, beat the butter at medium speed until it is smooth and very creamy. Add the sugars and salt and continue to beat until smooth and velvety, not fluffy and airy, about 1 minute. Reduce the mixer speed to low and beat in 2 egg yolks, again beating until well blended.
2. Turn off the mixer, pour in the flour, drape a kitchen towel over the mixer and pulse the mixer about 5 times at low speed for 1 or 2 seconds each time. Take a peek; if there is still a lot of flour on the surface of the dough, pulse a couple of more times; if not, remove the towel. Continuing at low speed, stir for about 30 seconds more, just until the flour disappears into the dough and the dough looks uniformly moist. If you still have some flour on the bottom of the bowl, stop mixing and use a rubber spatula to work the rest of it into the dough. (The dough will not come together in a ball -- and it shouldn't. You want to work the dough as little as possible. What you're aiming for is a soft, moist, clumpy dough. When pinched, it should feel a little like Play-Doh.)
3. Scrape the dough onto a work surface, gather it into a ball and divide it in half. Shape each piece into a smooth log about 9 inches long (it's easiest to work on a piece of plastic wrap and use the plastic to help form the log). Wrap the logs well and chill them for at least 2 hours. The dough may be kept in the refrigerator for up to 3 days or frozen for up to 2 months.
4. When ready to bake, center a rack in the oven and preheat the oven to 350 degrees. Line a baking sheet with a silicone baking mat or parchment paper and keep it at the ready.
5. To decorate the edges of the sables, whisk the egg yolk until smooth. Place one log of chilled dough on a piece of waxed paper and brush it with yolk (the glue), and then sprinkle the entire surface of the log with sugar. Trim the ends of the roll if they are ragged and slice the log into 1/3-inch-thick cookies.
6. Place the rounds on the baking sheet, leaving an inch of space between each cookie, and bake for 17 to 20 minutes, rotating the baking sheet at the halfway point. When properly baked, the cookies will be light brown on the bottom, lightly golden around the edges and pale on top. Let the cookies rest 1 or 2 minutes before carefully lifting them onto a cooling rack with a wide metal spatula. Repeat with the remaining log of dough. (Make sure the sheet is cool before baking each batch.)
Recipe courtesy of Baking by Dorie Greenspan
Thursday, March 13, 2008
This Is Not Chocolate Cake
But it sure does look like it, doesn't it? There's not a bit of chocolate in this Sticky Teff-Kissed Spice Loaf. The dark color comes from blackstrap molasses, super-thick and bittersweet. I love this cake. I've made it a few times and each time it's a winner. Sweet but not overly so, and a little spicy, thanks to ground ginger, cinnamon, allspice and cloves, plus some fresh grated ginger. The other secret ingredient is teff flour, a very nutritious whole grain flour. Compared to other grains, teff has a much larger percentage of bran and germ so it's a very good source of dietary fiber, protein and iron. Of course, I probably counteract all the health benefits but eating the cake with a dollop of fresh whipped cream on top.
The recipe makes two loaves, so I shared one from this recent batch with my friend Deena. Make some for you and a friend today.--S
Sticky Teff-Kissed Spice Loaves
2 c whole-wheat pastry flour
1 c brown teff flour
1 1/2 t baking soda
1/2 t fine-grain sea salt
2 t ground ginger
1 T ground cinnamon
1/2 t ground allspice
1/4 t ground cloves
1 c unsalted butter
1/2 c water
3/4 c blackstrap molasses
3/4 c honey
1 c natural cane sugar
3 large eggs, at room temperature
1/2 c milk
1-inch piece fresh ginger, peeled and grated
Freshly whipped cream, for topping
1. Preheat the oven to 325 and position the racks in the middle of the oven. Butter and flour two 8x4-in. loaf pans, tapping out any extra flour.
2. Combine the flours, baking soda, salt, ground ginger, cinnamon, allspice, and cloves and whisk to combine.
3. Combine the butter, water, molasses, honey, and sugar in a small saucepan over medium heat. Cook, stirring, until well-blended. Pour into a large bowl and let cool until it isn't hot on your tongue when you're sneaking a taste. Whisk in the eggs one at a time and then the milk. Switch to a rubber spatula and fold in the dry ingredients in 3 increments. You might have a few lumps, but resist overmixing. Fold in the grated ginger.
4. Pour the batter into the prepared pans and bake for 50 to 60 minutes, or until loosely set in the center. Don't overbake or you'll lose much of the signature stickiness. Let cool in the pan. Slice and serve with a big dollop of whipped cream.
NB: These cakes keep beautifully in the refrigerator for up to a week. They also freeze well double-bagged in plastic with the air pressed out.
Recipe courtesy of Super Natural Cooking
Sunday, March 09, 2008
Somewhere Between Stuttgart and Paris
I visited Alsace once during the year I spent as a student in Paris. Unfortunately, I have only a fuzzy memory of what I ate on that trip: a bowl of choucroute here, a slice of kugelhopf there. Fortunately, the March issue of Gourmet features a terrific collection of "Alsatian Sensation" recipes to bring me right back to Strasbourg. Last night I made Chicken in Riesling, Alsace's version of coq au vin. I definitely did not eat this when I visited Alsace, because there is no way I would've forgotten such a delicious and comforting meal.
As the recipe's headnote explains, coq au vin made with red wine is probably the best-known take on the French dish in America. But most regions of France have their own version incorporating local wines. Naturally, Alsace's coq au vin calls on Riesling to give a "gentle richness" to the dish. Fork has always been a Riesling fan, and for last night's meal he picked out a 2005 Trimbach Riesling, which was a little citrusy and fruity with a nice dry finish.
I used my cast-iron dutch oven to brown chicken breasts and thighs in oil and butter, then took the chicken out and cooked chopped leeks and shallot until they were golden. I returned the chicken to the pot, along with carrots and a cup of the wine. Once the liquid reduced, I put the dish in a 350-degree oven for 20 minutes. While the chicken braised, I peeled small red potatoes, which was a little time-consuming, but I took a seat for the task, and took sips of wine to keep me going. I simmered the potatoes until they were just tender. The final step: a half-cup of heavy cream into the chicken dish (my supermarket didn't have creme fraiche, which the recipe suggested), a shot of lemon juice, and the potatoes.
It was very quiet while Fork and I ate. After a minute he said, "This is a winner." After a few more minutes, as the chicken started disappearing, we sopped up the flavorful broth and bits of shallot and leek with bread. Chicken in Riesling: a winner, a new Alsatian taste, a classic.--S
Friday, March 07, 2008
Macaroni Pie
Last night's dinner was a bit of a dud with the best intentions: I decided to finally use some dried pasta and porcini mushrooms my mom brought me back from Italy a few months ago, but to rather poor effect. The sauce I made--from garlic, olive oil and canned tomatoes--wasn't rich enough for the mushrooms, and adding cream helped only slightly. I was truly bummed over handling such fine ingredients so poorly, and moped around all night until Fork got the brilliant idea that I should make a batch of Blondies. It helped a little.
But tonight I was determined to make something good out of the leftovers. I'd saved about half the pasta--"stringozzi" that was thicker than spaghetti and had a delightful chewiness to it--and did not sauce it, just drizzled it with olive oil to prevent it from clumping. My idea this evening was to make macaroni pie, something I'd never made before but that I know various family members adore.
I went with Giada De Laurentiis's recipe for Pizza di Spaghetti. She has you dress cooked spaghetti with olives and tomato sauce; I skipped the olives and made a batch of my mom's sauce, and mixed it in with the pasta. In a bowl, you combine eggs, milk and grated Parmesan with a little salt and pepper, and then you add your sauced pasta to that mixture. You grease a non-stick skillet with a good amount of olive oil, then pour the pasta-egg mixture in, pressing it down into the pan. After eight or so minutes you very carefully flip it onto a plate and slide it back into the pan so the other side can cook, a maneuver not unlike Spanish Laura's technique when making tortilla espanola. Another six minutes and it's ready to eat.
This was the delicious meal I'd wanted last night. The crispy exterior gave way to the soft and chewy pasta inside, and the overall taste of the dish was richer, more flavorful and pulled-together than simple pasta with tomato sauce, thanks to the binding powers of egg, milk and cheese. I am so relieved my mother didn't schlepp that pasta home from Umbria for nothing.--S
Monday, March 03, 2008
A Wintry Seafood Dinner
For Fork's birthday last week, we kept with tradition and went out for a fancier-than-usual dinner, this year at The Modern. It was a grand meal, showcasing Alsatian specialties from tarte flambee to liverwurst to apple streudel. We went the day after Fork's birthday, so on his actual day, I wasn't about to chintz out and order a pizza (and that's not because we're lacking good pizza delivery these days).
I planned a special meal at home on Fork's birthday involving many of his favorite foods, including an opening smorgasbord of Saint-Marcellin cheese with crusty baguette, shrimp cocktail, cerignola olives and a bottle of Alabarino. For dinner, I returned to a recipe I'd tried once before, Striped Bass with Lemon, White Wine, and Butter Sauce, from The Flexitarian Table. You could use any firm white fish for this dish: striped bass, cod, hake, halibut or snapper. I did use bass, a nice thick fillet from Whole Foods. The technique is a cinch: you lay the fish in an ovenproof skillet, place cubes of butter and chopped shallot over it, pour a third of a cup of dry white wine and some lemon juice over and around it, and season it with salt, red pepper flakes and sprigs of thyme. You bring the liquid to a boil over high heat, and then transfer the skillet to a 400-degree oven. About 15 or 20 minutes later you've got a moist, rich and deeply flavorful piece of fish.
On the side, I served Braised Leeks au Gratin, a recipe from my mom. I made sure to use top-notch ingredients, since there aren't many in the dish to begin with: sharp Parmigiano-Reggiano, uniformly chopped bread crumbs from a whole wheat boule, Kitchen Basics chicken stock, and big, bright leeks. The result was a warm and cozy meshing of soft leeks and crunchy cheese and bread.
It was a rather nice primer to Friday night's Alsatian feast, if I do say so myself.--S
Striped Bass with Lemon, White Wine, and Butter Sauce
1 1-lb. striped bass fillet
3 T unsalted butter, cubed
2 T finely chopped shallot
1/3 c. dry white wine
2 T fresh lemon juice
Sea salt or kosher salt
Pinch of red pepper flakes
3-4 sprigs of fresh thyme or tarragon
1. Set a rack in the upper third of the oven and preheat the oven to 400 degrees.
2. Lay the fish in an ovenproof skillet that will hold it comfortably (cut it in half if necessary). Scatter the butter cubes and shallot over the fish, pour the wine and lemon juice over and around, and season the fish with salt and the red pepper flakes. Scatter the thyme or tarragon sprigs over the fish.
3. Bring to a boil over high heat, then transfer the pan to the oven and bake until a thermometer inserted into the center of the fish registers 125 to 130 degrees, about 10 minutes, or until the fish is cooked through but still moist. Discard the herbs and transfer the fish to a warm platter.
4. Place the pan over high heat, bring the sauce to a simmer, and simmer until it begins to thicken, 2-3 minutes. Pour the sauce over the fish and serve.
Serves 2 to 3
Recipe courtesy of The Flexitarian Table
Braised Leeks au Gratin
1 T olive oil
1 T butter
3 large leeks
Salt
Freshly ground black pepper
1/2 – 1 c. chicken or vegetable stock
1 c. Parmigiano-Reggiano cheese, grated
1/2 c. breadcrumbs (or stale bread)
3 – 4 T fresh parsley, chopped
1. Wash the leeks well, being sure to be rid of any sand that gets trapped in between the leaves. Slice in half lengthwise and cut into 3” logs.
2. Pre-heat a large sauté pan over medium high heat. Add the olive oil and butter and blend well. When the butter has stopped sizzling, add the leeks, cut side down to the pan. Brown well and then turn them over. Season with salt and pepper.
3. Add the chicken stock to the pan, so that it comes half way up the side of the leeks. Bring the stock to a simmer and then reduce the heat to very low. Cover with a tight-fitting lid and simmer for 10 minutes or until the leeks are tender to a knife point.
4. When the leeks are tender, pre-heat the broiler and increase the heat and reduce the chicken stock until it only just covers the bottom of the pan.
5. Sprinkle the parmesan cheese and breadcrumbs all over the top of the leeks and place the pan under the broiler. Alternately, if you want to take the leeks directly to the table, transfer the leeks to an oven-safe casserole dish and then top them with the cheese and breadcrumbs. Broil until the cheese melts and starts to turn brown.
6. Garnish with chards of Parmigiano-Reggiano cheese and fresh chopped parsley.
Serves 4 as a side dish
Subscribe to:
Posts (Atom)