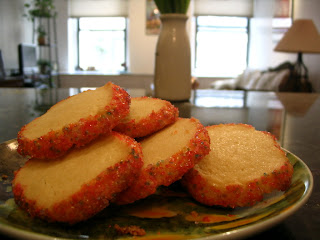
 As Dorie Greenspan explains in the intro to her recipe for Sablés, the tender shortbread cookies are as popular in France as chocolate chip cookies are in the U.S. The French word "sablé" means "sandy" in English, and it isn't too far a stretch to imagine these cookies as pecan sandies minus the pecans, since they are buttery, crumbly and truly melt-in-your-mouth. I was looking for a simple yet delicious cookie to give to friends yesterday, and these fit the bill perfectly. I was even able to give them a little springy touch by using sparkly multicolored pastel sugar.
The key to keeping sablés sandy is to mix the dough just enough so the flour is incorporated. You want to work the dough as little as possible; Dorie says it should be moist and clumpy, as opposed to smooth. The other important thing to consider is that butter is the star ingredient in sablés, so it's wise to use quality stuff. The March issue of Saveur has an amazing spread (ha) of great butters, including Plugra European Style Butter, an 82%-fat sweet cream butter, which I used for the sablés. Dorie says the longer you chill the dough before baking the cookies, the better; I chilled it overnight.
 It's hard to see a cookie like this taking off in the U.S.--it's too understated and simple to gain real traction against the chocolate chip or the oatmeal raisin. But when you want something yummy to accompany a nice cup of tea, a sablé is just the thing.--S
Sablés
2 sticks (8 oz.) unsalted butter (preferably high-fat, like Plugra), softened at room temperature
1/2 c granulated sugar
1/4 c confectioners' sugar, sifted before measuring
1/2 t salt, preferably sea salt
2 large egg yolks, preferably at room temperature
2 cc all-purpose flour.
For the decoration (optional):
1 egg yolk
Crystal or dazzle sugar
1. Working in a mixer fitted with a paddle attachment, beat the butter at medium speed until it is smooth and very creamy. Add the sugars and salt and continue to beat until smooth and velvety, not fluffy and airy, about 1 minute. Reduce the mixer speed to low and beat in 2 egg yolks, again beating until well blended.
2. Turn off the mixer, pour in the flour, drape a kitchen towel over the mixer and pulse the mixer about 5 times at low speed for 1 or 2 seconds each time. Take a peek; if there is still a lot of flour on the surface of the dough, pulse a couple of more times; if not, remove the towel. Continuing at low speed, stir for about 30 seconds more, just until the flour disappears into the dough and the dough looks uniformly moist. If you still have some flour on the bottom of the bowl, stop mixing and use a rubber spatula to work the rest of it into the dough. (The dough will not come together in a ball -- and it shouldn't. You want to work the dough as little as possible. What you're aiming for is a soft, moist, clumpy dough. When pinched, it should feel a little like Play-Doh.)
3. Scrape the dough onto a work surface, gather it into a ball and divide it in half. Shape each piece into a smooth log about 9 inches long (it's easiest to work on a piece of plastic wrap and use the plastic to help form the log). Wrap the logs well and chill them for at least 2 hours. The dough may be kept in the refrigerator for up to 3 days or frozen for up to 2 months.
4. When ready to bake, center a rack in the oven and preheat the oven to 350 degrees. Line a baking sheet with a silicone baking mat or parchment paper and keep it at the ready.
5. To decorate the edges of the sables, whisk the egg yolk until smooth. Place one log of chilled dough on a piece of waxed paper and brush it with yolk (the glue), and then sprinkle the entire surface of the log with sugar. Trim the ends of the roll if they are ragged and slice the log into 1/3-inch-thick cookies.
6. Place the rounds on the baking sheet, leaving an inch of space between each cookie, and bake for 17 to 20 minutes, rotating the baking sheet at the halfway point. When properly baked, the cookies will be light brown on the bottom, lightly golden around the edges and pale on top. Let the cookies rest 1 or 2 minutes before carefully lifting them onto a cooling rack with a wide metal spatula. Repeat with the remaining log of dough. (Make sure the sheet is cool before baking each batch.)
Recipe courtesy of Baking by Dorie Greenspan

No comments:
Post a Comment